Pages

Friday, December 3, 2010

A Southern Snowman

Melted Snowman In Texas 


If you live in Cypress, Texas or in the surrounding area, then you know that a snowman in Texas is rare. It is very seldom that it snows here, and when it does we don't always have enough to build a snowman. Here is one you can keep around all Christmas long.


This is another one of my finds from the Nutcracker Market. I originally picked this top hat out to put on my Christmas tree but decided to go in a different direction with the tree.


I went to hobby lobby for the paint, snow and buttons.


I found this piece of wood laying around my craft drawer, which I am sure was for a project one of the the boys had, because I don't even know what it is. I layed out some newspaper on my counter and painted the wood before I did anything else, so that it would have time to dry. Be sure not to turn the painted wood over and paint the other side until the first side is dry.


I chose one of my old shirts to cut the sleeves off of. The best shirt to use is one of your husbands old dress shirts. Not because - better his than yours but because the sleeves are longer. Makes for a better scarf. I didn't think of that until later. I may go back and have a look in his closet....I'm sure he will love that.


After I cut the sleeves off at the shoulders, I turned the sleeves so that they matched up at the corners, sort of like a triangle. The sleeves magically turned into a scarf. How about that?


Next, I made slits in the ends of my scarf, for a more realistic look.


I hot glued the sleeves together at the top. 


I pulled out the twinkle fluff/faux snow and shaped it into a circle. Sat it on top of the scarf and then sat the hat on top of the fluff. I did not glue any of these items together.


I picked the biggest buttons I could find that looked like coal... you know, "two eyes made out of coal.." The Frosty the Snowman Song?


I did hot glue the buttons to the hat. Just a dab.


After his nose was dry, I stuck the nose in the fluff and put a small dab of hot glue to hold it in place.


I took him outside and placed him on a table on the porch, plugged him in and lit him up. All he is missing is a corn cob pipe! I will be on the look out for an old pipe. I might even add a patch to his scarf. Whatever I decide to do, I will show you! Have fun with your snowman! You can even do this craft with your kids or surprise them and have Not so Frosty greet them at the door! Enjoy!

Thursday, December 2, 2010

Hard Candy Christmas


Today is Tablescape Thursday over at BNOTP! If you have not been there yet, today is the day! If you are having Christmas dinner at your house this year and you need help decorating, there is no better place to visit! There are hundreds of links to blogs about decorating for the holidays. I know it will give you some good ideas.


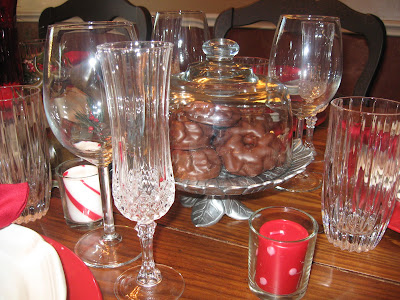
 My formal dinning has a peppermint theme that I try and add to every year.


These red glass candle holders on each end are a new edition to my tablescape this year. I found two of these at Ross of all places, very inexpensive.


Resources

Swags with berries/centerpiece - Hobby Lobby (years ago)
Red  tall Candelabras - Hobby Lobby (years ago)
short red candelabras - Ross (this season)
peppermint candles - Pier One (this season)
Reindeer in Centerpiece - Sam Moon (two years ago)
Tablecloth - Target
Dishes - Mikasa, French Countryside (wedding registry) a long time ago, really long...
Red Chargers - Pier One (years ago)
Silver napkin rings - Hobby Lobby (years ago)
Champagne glasses - Mikasa Outlet
Water glasses - Mikasa wedding registry
Wine glasses - TJ Maxx (this season)
Red napkins - Target (years ago)
Large Pewter Platter and bowl - The Pewter Lady (this season)
dessert stand with glass cover - arthur court (gift)
Peppermint ornaments - Hobby Lobby

As you can see, picking a theme, color or decorations to start a base tablescape is the way to go. Adding to it every year is fun. Over time you will have collected beautiful pieces, one memory at a time.

Wednesday, December 1, 2010

Cypress Chique: Krafty Kat Holiday Hookup

Cypress Chique: Krafty Kat Holiday Hookup

Warm up with some Taco Soup


This is the perfect soup to keep you warm from the inside out! My whole family loves this soup, even my neighbors and my kids friends. It is an easy crowd pleaser and this recipe makes a lot of soup. This recipe for Taco Soup probably feeds 6-8 people, maybe even 10. If you don't need that much soup, divide up the leftovers in individual containers and freeze it. Don't forget to leave some for lunch the day after!


Ingredients


Dice your onion. I used a half of an onion.


Brown the ground beef and onions in a large skillet and drain excess fat.


I did not put mine in a slow cooker. I did the short cook time version, in a regular stock pot.

I added 2 cans of pinto beans (do not drain)...


Added 1 can of kidney beans (do not drain) add 1 can of corn (drained)....


Added the can of Mexican-style stewed tomatoes (do not drain)...


Added 1 can of diced tomatoes (do not drain)....


Added 1 can of tomatoes with chiles (do not drain)..


I Added in 2 cans of diced green chiles...


I added taco seasoning packet and ranch dressing mix packet. The recipe calls for black and green olives too. However, I skipped this step because none of my family likes olives including myself. I know......it's sad but true.


Then I stirred to mix the ingredients and let it simmer for 1 hour.


This is what it looked like when the soup was ready. Are you ready for the kicker....? We ate it so fast, I forgot to take a picture of our pretty bowls of soup!! I add a dollup of sour cream on top of the bowl of soup, sprinkle on some grated cheese and some tortilla strips and green onions. You can add jalapenos for a real kick or maybe some avocados. Yum! You will have to see for yourself now! Go on and try it!